前言 OpenResty 是基于 Nginx 的高性能 Web 应用服务器,它集成了 Lua 编程语言,使开发人员能够快速构建灵活、可扩展的 Web 应用程序。借助 OpenResty,您可以利用 Nginx 强大的性能特点和 Lua 的编程能力来处理复杂的业务逻辑,并实现高并发和高效率的请求处理。同时,OpenResty 还提供了丰富的 Lua 库和模块,简化开发过程,如处理 HTTP 请求、操作数据库等。总之,OpenResty 是一个强大而简洁的工具,适用于构建高性能的 Web 应用程序。
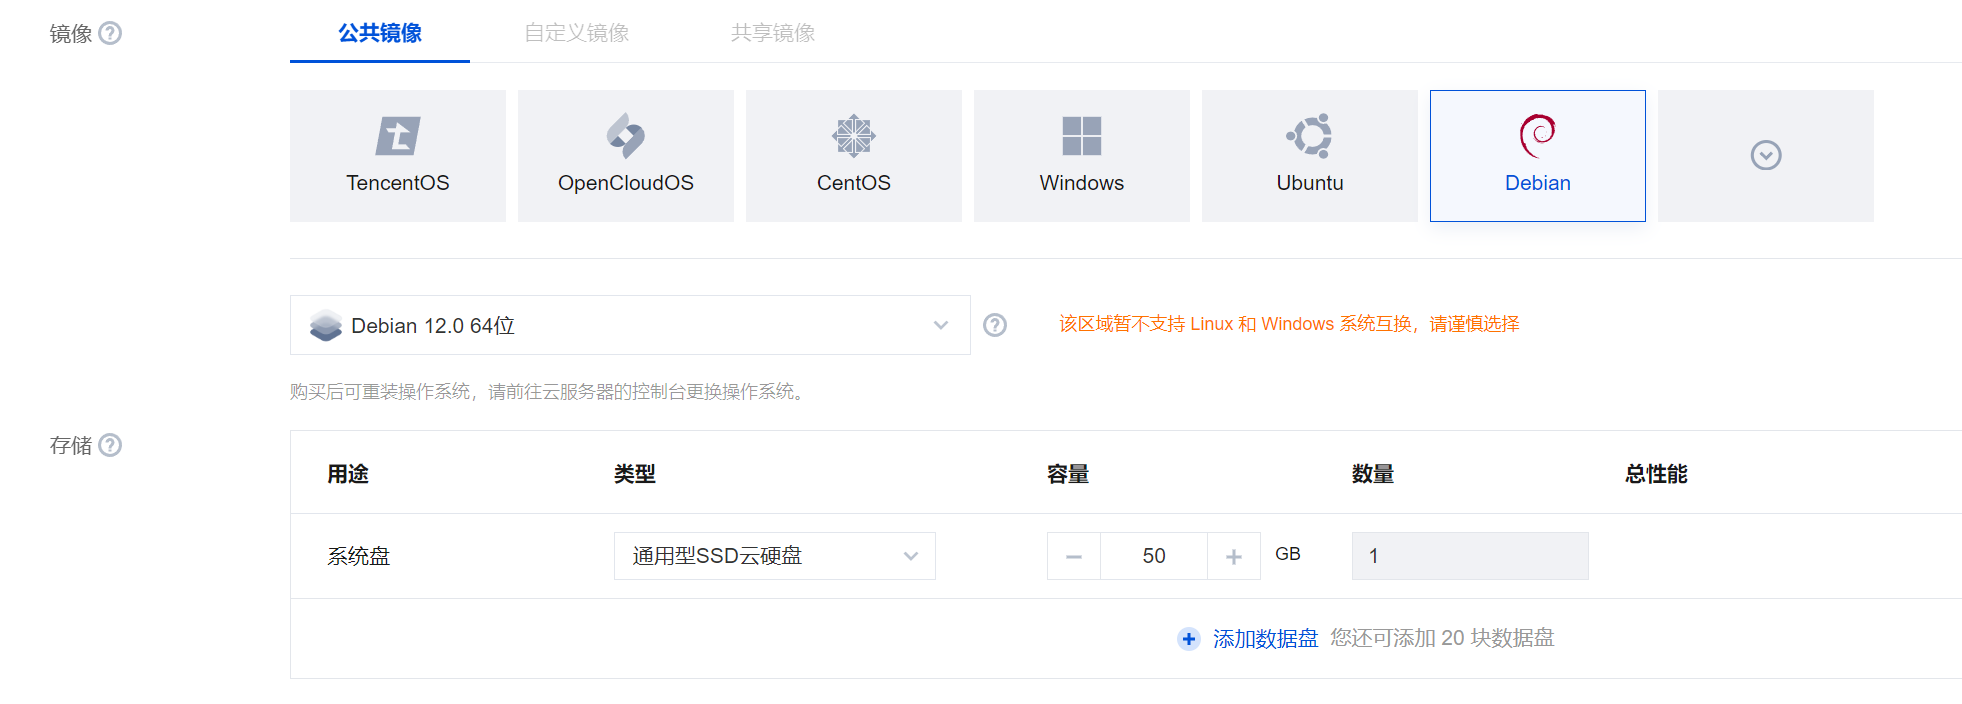
环境 本文章使用的是腾讯云CVM 服务器。系统为Debian 12 。OpenResty版本为 1.21.4.2
安装OPENRESTY
本次是基于源码编译安装,也可以使用包管理器安装
编译环境
1
2
3
4
5
6
root@VM-0-3-debian:~ No LSB modules are available. Distributor ID: Debian Description: Debian GNU/Linux 12 (bookworm) Release: 12 Codename: bookworm
安装依赖 1 2 sudo apt update sudo apt install -y libgeoip-dev libpcre3 libpcre3-dev openssl libssl-dev libmaxminddb0 libmaxminddb-dev mmdb-bin libgeoip1 libgeoip-dev geoip-bin build-essential gcc libtool autoconf zlib1g zlib1g-dev git
安装libmaxminddb
libmaxminddb 是一个 C 语言库,用于解析 MaxMind DB 格式的 IP 地理位置数据库。
1 2 3 4 5 6 7 8 9 10 wget https://github.com/maxmind/libmaxminddb/releases/download/1.7.1/libmaxminddb-1.7.1.tar.gz tar -xzvf libmaxminddb-1.7.1.tar.gz cd libmaxminddb-1.7.1./configure make make check sudo make install sudo sh -c "echo /usr/local/lib >> /etc/ld.so.conf.d/local.conf" sudo ldconfig
准备openssl、pcre和zlib
查询openssl版本
1 2 root@VM-0-3-debian:~ OpenSSL 3.0.9 30 May 2023 (Library: OpenSSL 3.0.9 30 May 2023)
我们手动下载对应版本的openssl、pcre和zlib,注意这三个库只需要下载解压,并不需要提前进行安装。
1 2 3 4 5 6 7 8 9 10 wget https://www.openssl.org/source/openssl-3.0.9.tar.gz wget http://ftp.cs.stanford.edu/pub/exim/pcre/pcre-8.45.tar.gz wget http://www.zlib.net/zlib-1.3.tar.gz tar -zxvf openssl-3.0.9.tar.gz tar -zxvf pcre-8.45.tar.gz tar -zxvf zlib-1.3.tar.gz
下载ngx_http_geoip2_module
ngx_http_geoip2_module 是一个用于 Nginx 的第三方模块,它提供了对 MaxMind GeoIP2 数据库的支持。
1 2 git clone https://github.com/leev/ngx_http_geoip2_module.git
创建用户&&组&&目录 1 2 3 groupadd nginx useradd -g nginx -s /sbin/nologin -M nginx mkdir -p /var/cache/nginx
下载openresty 1 2 3 wget https://openresty.org/download/openresty-1.21.4.2.tar.gz tar -zxvf openresty-1.21.4.2.tar.gz
编译安装
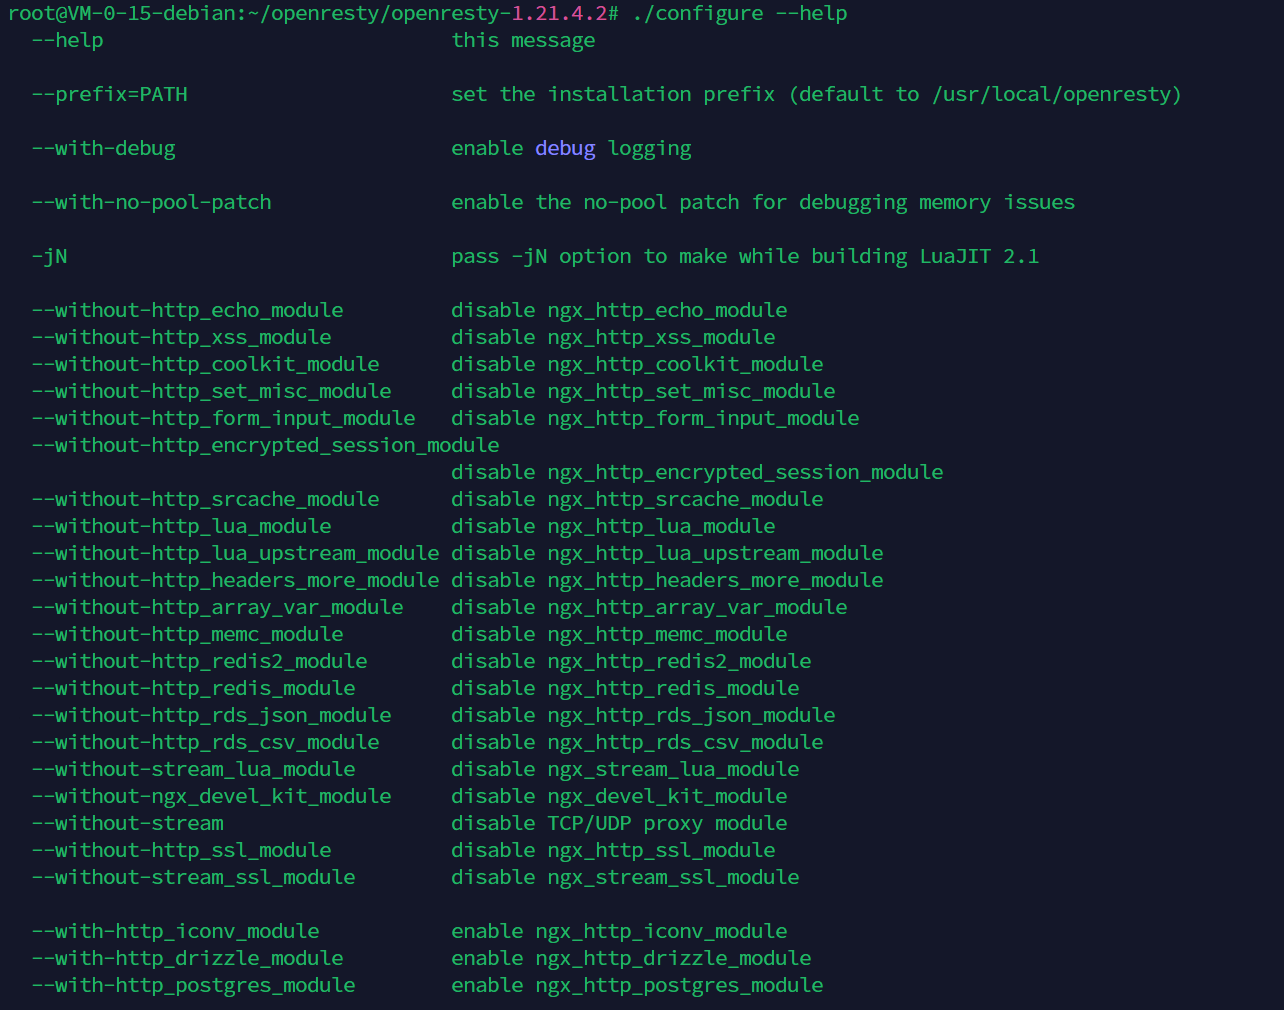
我们可以自定义编译安装的模块,这里可以查看openresty模块的官方说明 或使用./configure --help。
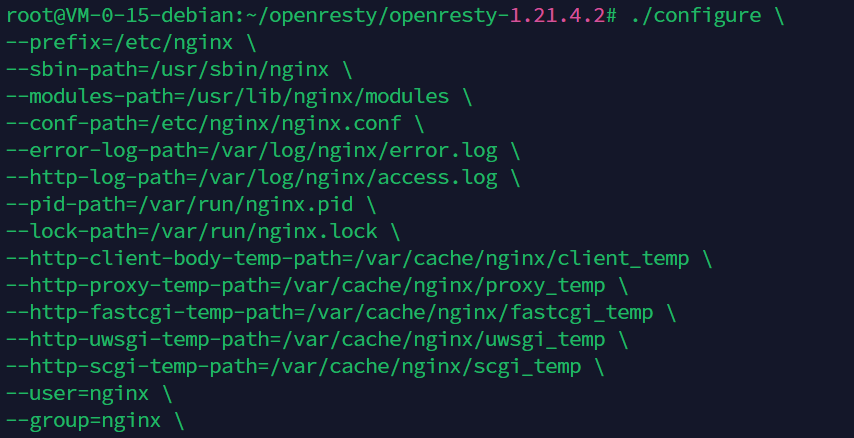
1 2 3 4 5 6 7 8 9 10 11 12 13 14 15 16 17 18 19 20 21 22 23 24 25 26 27 28 29 30 31 32 33 34 35 36 37 38 39 40 41 42 43 44 45 46 47 48 49 50 ./configure \ --prefix=/etc/nginx \ --sbin-path=/usr/sbin/nginx \ --modules-path=/usr/lib/nginx/modules \ --conf-path=/etc/nginx/nginx.conf \ --error-log-path=/var/log/nginx/error.log \ --http-log-path=/var/log/nginx/access.log \ --pid-path=/var/run/nginx.pid \ --lock-path=/var/run/nginx.lock \ --http-client-body-temp-path=/var/cache/nginx/client_temp \ --http-proxy-temp-path=/var/cache/nginx/proxy_temp \ --http-fastcgi-temp-path=/var/cache/nginx/fastcgi_temp \ --http-uwsgi-temp-path=/var/cache/nginx/uwsgi_temp \ --http-scgi-temp-path=/var/cache/nginx/scgi_temp \ --user=nginx \ --group=nginx \ --with-compat \ --with-file-aio \ --with-threads \ --with-http_addition_module \ --with-http_auth_request_module \ --with-http_dav_module \ --with-http_flv_module \ --with-http_gunzip_module \ --with-http_gzip_static_module \ --with-http_mp4_module \ --with-http_random_index_module \ --with-http_realip_module \ --with-http_secure_link_module \ --with-http_slice_module \ --with-http_ssl_module \ --with-http_stub_status_module \ --with-http_sub_module \ --with-http_v2_module \ --with-mail \ --with-mail_ssl_module \ --with-stream \ --with-stream_realip_module \ --with-stream_ssl_module \ --with-stream_ssl_preread_module \ --with-luajit \ --with-pcre-jit \ --with-http_geoip_module \ --with-http_dav_module \ --add-module=/root/openresty/ngx_http_geoip2_module \ --with-openssl=/root/openresty/openssl-3.0.9 \ --with-zlib=/root/openresty/zlib-1.3 \ --with-pcre=/root/openresty/pcre-8.45
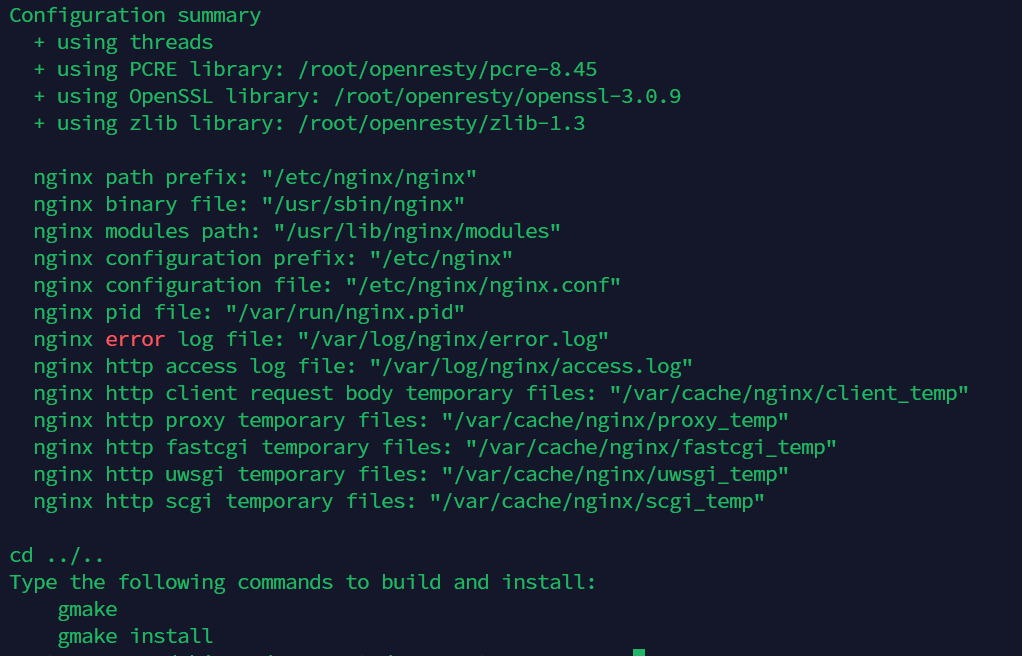
运行gmake 命令来编译软件包,最后使用 gmake install 命令来安装它
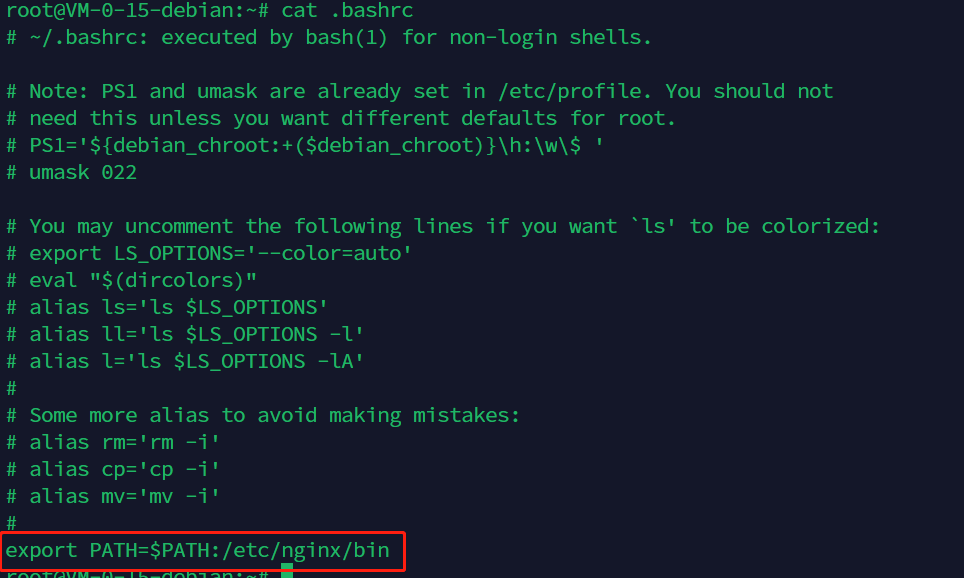
配置环境变量
在~/.bashrc文件中添加环境变量,然后执行source ~/.bashrc使其生效。
1 2 3 4 vim ~/.bashrc export PATH=$PATH :/etc/nginx/binsource ~/.bashrc
配置systemctl管理openresty
在/etc/systemd/system/nginx.service目录下创建nginx.service文件。
1 2 3 4 5 6 7 8 9 10 11 12 13 14 15 16 17 18 19 cat > /etc/systemd/system/nginx.service << EOF [Unit] Description=Nginx(OpenResty ) - high performance web server After=network-online.target remote-fs.target nss-lookup.target Wants=network-online.target [Service] Type=forking PIDFile=/var/run/nginx.pid ExecStartPre=/usr/sbin/nginx -t -c /etc/nginx/nginx.conf ExecStart=/usr/sbin/nginx -c /etc/nginx/nginx.conf ExecReload=/bin/sh -c "/bin/kill -s HUP " ExecStop=/bin/sh -c "/bin/kill -s TERM " LimitNOFILE=65535 [Install] WantedBy=multi-user.target EOF
然后执行systemctl daemon-reload使其生效。systemctl enable nginx使其开机自启。systemctl start nginx启动openresty。
1 2 3 4 systemctl status nginx systemctl stop nginx systemctl restart nginx
打开浏览器访问http://ip:80,如果出现下面页面则说明安装成功。
OpenResty操作命令
openresty的操作指令和nginx是完全一致的。具体如下:
1 2 3 4 5 6 7 8 9 10 11 12 13 14 15 16 17 root@VM-0-15-debian:~ nginx version: openresty/1.21.4.2 Usage: nginx [-?hvVtTq] [-s signal] [-p prefix] [-e filename] [-c filename] [-g directives] Options: -?,-h : this help -v : show version and exit -V : show version and configure options then exit -t : test configuration and exit -T : test configuration, dump it and exit -q : suppress non-error messages during configuration testing -s signal : send signal to a master process: stop, quit, reopen, reload -p prefix : set prefix path (default: /etc/nginx/nginx/) -e filename : set error log file (default: /var/log/nginx/error.log) -c filename : set configuration file (default: /etc/nginx/nginx.conf) -g directives : set global directives out of configuration file
配置openresty
IP数据库:GeoLite2-City ,下载后放在/etc/nginx/goeip2/目录下。
配置文件路径/etc/nginx/nginx.conf,下面是我配置的文件,可以根据自己的需求进行修改。
1 2 3 4 5 6 7 8 9 10 11 12 13 14 15 16 17 18 19 20 21 22 23 24 25 26 27 28 29 30 31 32 33 34 35 36 37 38 39 40 41 42 43 44 45 46 47 48 49 50 51 52 53 54 55 56 57 58 59 60 61 62 63 64 65 66 67 68 69 70 71 72 73 74 75 76 77 78 79 80 81 82 83 84 85 86 87 88 89 90 91 92 93 94 95 96 97 98 99 100 101 102 103 104 105 106 107 108 109 110 111 112 113 114 115 116 117 118 119 120 121 122 123 124 125 126 127 128 129 130 131 132 133 134 135 136 137 138 139 140 141 142 143 144 145 146 147 148 149 150 151 152 153 154 155 156 157 158 159 160 161 162 163 164 165 166 167 168 169 170 171 172 173 174 175 176 177 178 179 180 181 182 183 184 185 186 187 188 189 190 191 192 193 194 195 196 197 198 199 200 201 202 203 204 205 206 207 208 209 #path /etc/nginx/nginx.conf # 指定启动nginx使用的用户(不指定为nobody) user nginx; # 定义作为web服务器/反向代理服务器时的 worder process 进程数 worker_processes auto; # 开启多核支持,且自动根据CPU个数均匀分配 worder process 进程数 worker_cpu_affinity auto; # 指定一个nginx进程可以打开的最多文件描述符数目 worker_rlimit_nofile 65535; # error_log配置,等级类型:[ debug | info | notice | warn | error | crit ] error_log /var/log/nginx/error.log notice; # nginx的进程pid位置; pid /var/run/nginx.pid; # 连接处理相关设置 events { # 使用epoll的 I/O 模型,必开项,极其有利于性能 use epoll; # 设置是否允许一个worker可以接受多个请求,默认是off; # 值为OFF时,一个worker process进程一次只接收一个请求,由master进程自动分配worker(nginx精于此道,故建议设置为off); # 值为ON则一次可接收所有请求,可避免master进程额外调度,但是在高瞬时值的情况下可能导致tcp flood; multi_accept off; # 每个工作进程的并发连接数(默认为1024) # 理论上nginx最大连接数 = worker_processes * worker_connections worker_connections 65535; } http { ################################ngx_lua_waf web应用防火墙################################ # ##WAF 配置资源引用开始 # lua_package_path "/etc/nginx/site/lualib/?.lua;;"; # lua_shared_dict limit 20m; # # init_by_lua_file /etc/nginx/luaconf/init.lua; # # access_by_lua_file /etc/nginx/luaconf/waf.lua; # lua_code_cache on; # # Set Prometheus global dict # lua_shared_dict prometheus_metrics 10M; #init 10M memory # lua_shared_dict uri_by_host 10M; # lua_shared_dict global_set 1M; ################################ngx_lua_waf web应用防火墙################################ charset utf-8; # mime.types 指定了nginx可以接受的 Content-Type,该文件默认位于nginx.conf的同级目录 include /etc/nginx/mime.types; # 设置默认文件类型,application/octet-stream 表示未知的应用程序文件,浏览器一般不会自动执行或询问执行 default_type application/octet-stream; ################################获取访问用户真实IP(而不是CDN节点IP)################################ set_real_ip_from 0.0.0.0/0; real_ip_header X-Forwarded-For; real_ip_recursive on; ################################IP数据库################################ geoip2 /etc/nginx/goeip2/GeoLite2-City.mmdb { auto_reload 5m; $geoip2_data_country_code country iso_code; $geoip2_data_country_name country names zh-CN; $geoip2_data_province_name subdivisions 0 names zh-CN; $geoip2_data_city_name city names zh-CN; $geoip2_data_location_latitude location latitude; $geoip2_data_location_longitude location longitude; } ################################设置日志的记录格式 ################################ log_format main escape=none '$geoip2_data_country_name - $geoip2_data_city_name - ' '$remote_addr - $remote_user [$time_local] "$request" ' '$status $body_bytes_sent "$http_referer" ' '"$http_user_agent" "$http_x_forwarded_for"'; # 不记录404错误的日志 log_not_found off; # 隐藏nginx版本号 server_tokens off; # 开启0拷贝,提高文件传输效率 sendfile on; # 配合 sendfile 使用,启用后数据包会累计到一定大小之后才会发送,减小额外开销,提高网络效率; tcp_nopush on; # 启用后表示禁用 Nagle 算法,尽快发送数据 # 与 tcp_nopush 结合使用的效果是:先填满包,再尽快发送 # Nginx 只会针对处于 keep-alive 状态的 TCP 连接才会启用 tcp_nodelay tcp_nodelay on; # 指定客户端与服务端建立连接后发送 request body 的超时时间,超时Nginx将返回http 408 client_body_timeout 10; # 开启从client到nginx的连接长连接支持,指定每个 TCP 连接最多可以保持多长时间 # keepalive_timeout的值应该比 client_body_timeout 大 keepalive_timeout 65; # keepalive_requests指令用于设置一个keep-alive连接上可以服务的请求的最大数量,当最大请求数量达到时,连接将被关闭 keepalive_requests 1000; ################################客户端请求头部的缓冲区大小,设置等于系统分页大小即可,如果header过大可根据实际情况调整;################################ # 查看系统分页:getconf PAGESIZE client_header_buffer_size 32k; # 设置客户端请求的Header头缓冲区大小,如果客户端的Cookie信息较大,按需增加 large_client_header_buffers 4 64k; # 优化读取\$request_body变量时的I/O性能 client_body_in_single_buffer on; # 设定request body的缓冲大小,仅在 Nginx被设置成使用内存缓冲时有效(使用文件缓冲时该参数无效) client_body_buffer_size 128k; # 开启proxy忽略客户端中断,避免499错误 proxy_ignore_client_abort on; # 默认的情况下nginx引用header变量时不能使用带下划线的变量,设置underscores_in_headers为 on取消该限制 underscores_in_headers on; # 默认的情况下nginx会忽略带下划线的变量,设置ignore_invalid_headers为off取消该限制 ignore_invalid_headers off; # 设置客户端向服务端发送一个完整的 request header 的超时时间,优化弱网场景下nginx的性能 client_header_timeout 10; # 设置向客户端传输数据的超时时间 send_timeout 60; # 用于启用文件功能时用限制文件大小; client_max_body_size 50m; ################################ 文件压缩配置,对文本文件效果较好,对图像类应用效果一般反而徒增服务器资源消耗################################ gzip on; # 兼容http 1.0 gzip_http_version 1.0; # 压缩比,数值越大:压缩的程度越高、空间占用越低、压缩效率越低、资源消耗越大 gzip_comp_level 6; # 设置压缩门限,小于该长度将不会进行压缩动作(数据过小的情况下,压缩效果不明显) gzip_min_length 1k; # 用于在nginx作为反向代理时,根据请求头中的“Via”字段决定是否启用压缩功能,默认值为off,any表示对所有请求启动压缩; gzip_proxied any; # 用于在启动gzip压缩功能时,在http响应中添加Vary: Accept-Encoding头字段告知接收方使用了gzip压缩; gzip_vary on; # 当Agent为IE6时禁用压缩:IE6对Gzip不友好,所以不压缩 gzip_disable msie6; # 设置系统用于存储gzip的压缩结果数据流的缓存大小(4 4k 代表以4k为单位,按照原始数据大小以4k为单位的4倍申请内存) gzip_buffers 4 64k; # 指定需要压缩的文件mime类型 gzip_types text/xml text/plain text/css application/javascript application/x-javascript application/xml application/json application/rss+xml; ################################ 作为反向代理服务器配置 ################################ # 当请求未携带“Host”请求头时将Host设置为虚拟主机的主域名 # proxy_set_header Host \$host; # 设置真实客户端IP # proxy_set_header X-Real-IP \$remote_addr; # 简称XFF头,即HTTP的请求端真实的IP,在有前置cdn或者负载均衡可能会被修改;如果要提取客户端真实IP,需要根据实际情况调整,如若后端程序获得对X-Forwarded-For兼容性不好的话(没有考虑到X-Forwarded-For含有多个IP的情况),建议设置为:\$http_x_forwarded_for # proxy_set_header X-Forwarded-For \$proxy_add_x_forwarded_for; # 启用nginx和后端server(upstream)之间长连接支持(必设项,否则很影响nginx性能),HTTP协议中从1.1版本才支持长连接;启用时需要评估upstream的keepalive参数(默认是关闭的,比较懒的同学可以设置为500) proxy_http_version 1.1; # 为了兼容老的协议以及防止http头中有Connection close导致的keepalive失效,需要及时清掉HTTP头部的Connection; # 该参数决定了访问完成后,后端server后如何处理本次连接,默认配置是主动close(会给后端server带来大量的TIME_WAIT连接,降低后端server性能),设置为""结合proxy_http_version设置连接保持(长连接); proxy_set_header Connection ""; # 用于对发送给客户端的URL进行修改,使用不到的话可以关闭 proxy_redirect off; # 设置缓冲区的大小和数量,用于放置被代理的后端服务器取得的响应内容 proxy_buffers 64 8k; # 设置和后端建立连接的超时时间,单位秒 proxy_connect_timeout 60; # 设置Nginx向后端被代理服务器发送read请求后,等待响应的超时时间,默认60秒 proxy_read_timeout 60; # 设置Nginx向后端被代理服务器发送write请求后,等待响应的超时时间,默认60秒 proxy_send_timeout 60; # 用于配置存放HTTP报文头的哈希表容量,默认为512个字符。一般都设置为1024,这个大小是哈希表的总大小, #设定了这个参数Nginx不是一次全部申请出来,需要用的时候才会申请; #但是当真正需要使用的时候也不是一次全部申请,而是会设置一个单次申请最大值(proxy_headers_hash_bucket_size) proxy_headers_hash_max_size 1024; # 用于设置Nginx服务器申请存放HTTP报文头的哈希表容量的单位大小,默认为64个字符。一般配置为128。 #这个大小是单次申请最多申请多大,也就是每次用需要申请,但是每次申请最大申请多少,整个哈希表大小不可超过上面设置的值。 proxy_headers_hash_bucket_size 128; # 设置缓存临时目录 proxy_temp_path /var/cache/nginx/proxy_temp; # 设置缓存目录、目录结构及缓存数据保留策略 proxy_cache_path /var/cache/nginx/proxy_cache levels=1:2 keys_zone=cache_one:512m inactive=1d max_size=2g; ################################ 预防 DDOS 攻击配置策略 ################################ #limit_req_zone \$binary_remote_addr zone=req:20m rate=3r/s; #limit_req zone=req burst=60; #limit_zone conn \$binary_remote_addr 20m; #limit_conn conn 5; #limit_rate 50k; ################################设置nginx可以捕获的服务器名字(server_name)的最大数量################################ server_names_hash_max_size 1024; ################################设置nginx中server_name支持的最大长度################################ server_names_hash_bucket_size 128; include /etc/nginx/conf.d/*.conf; }
配置ip查询接口
在/etc/nginx/conf.d/目录下创建ip.conf文件并修改为下面配置内容。
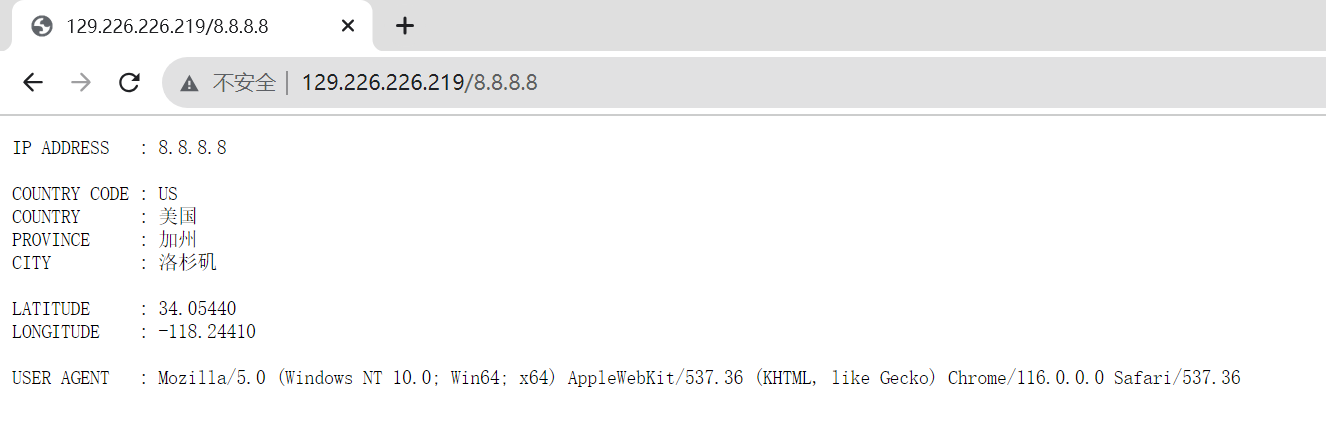
1 2 3 4 5 6 7 8 9 10 11 12 13 14 15 16 17 18 19 20 21 22 23 24 25 26 27 28 29 30 31 32 33 34 35 36 37 38 39 40 41 42 43 44 45 46 47 48 49 50 51 52 53 54 55 56 57 58 59 60 61 62 63 64 65 66 67 68 69 70 71 72 73 74 75 76 77 78 79 80 81 82 83 84 85 86 87 88 89 90 91 92 93 94 95 96 97 98 99 100 101 102 103 104 105 106 107 108 109 110 111 112 113 114 #path /etc/nginx/conf.d/ip.conf server { listen 80; server_name localhost; #listen 443 ssl http2; #listen [::]:443 ssl http2; #ssl_certificate /etc/nginx/conf.d/ssl/cert.pem; #ssl_certificate_key /etc/nginx/conf.d/ssl/key.pem; # server_name xxx.xxx.xxx; access_log /var/log/nginx/ip.log main; default_type text/plain; location / { if ($http_user_agent ~* "curl|wget") { rewrite / /ip last; } rewrite / /info last; } location /ip { echo $remote_addr; } location /country_code { echo $geoip2_data_country_code; } location /country { echo $geoip2_data_country_name; } location /province { echo $geoip2_data_province_name; } location /city { echo $geoip2_data_city_name; } location /latitude { echo $geoip2_data_location_latitude; } location /longitude { echo $geoip2_data_location_longitude; } location /ua { echo $http_user_agent; } location /info { echo "IP ADDRESS : $remote_addr"; echo " "; echo "COUNTRY CODE : $geoip2_data_country_code"; echo "COUNTRY : $geoip2_data_country_name"; echo "PROVINCE : $geoip2_data_province_name"; echo "CITY : $geoip2_data_city_name"; echo " "; echo "LATITUDE : $geoip2_data_location_latitude"; echo "LONGITUDE : $geoip2_data_location_longitude"; echo " "; echo "USER AGENT : $http_user_agent"; echo ""; echo "Use /help for more information"; } location /help { echo "/ IP INFO (browser) | IP ADDRESS (wget/curl)"; echo " "; echo "/ip IP ADDRESS"; echo " "; echo "/info IP INFO"; echo "/json IP INFO (JSON)"; echo " "; echo "/country_code COUNTRY CODE"; echo "/country COUNTRY NAME"; echo "/province PROVINCE NAME"; echo "/city CITY NAME"; echo " "; echo "/longitude LONGITUDE"; echo "/latitude LATITUDE"; echo " "; echo "/ua USER AGENT"; echo " "; echo "Advanced:"; echo "/{cmd}/{ip} FIND IP INFO, eg: /info/1.1.1.1"; } location /json { default_type application/json; return 200 '{ "ip": "$remote_addr", "country_code": "$geoip2_data_country_code", "country": "$geoip2_data_country_name", "province": "$geoip2_data_province_name", "city": "$geoip2_data_city_name", "latitude": "$geoip2_data_location_latitude", "longitude": "$geoip2_data_location_longitude", "ua": "$http_user_agent", "forwarded": "$http_x_forwarded_for" }'; } location ~ ^/(\w+/)?(\d+\..+|\w*:.+)$ { proxy_pass http://127.0.0.1/$1; proxy_set_header Host $host; proxy_set_header X-Forwarded-For $2; } }
执行nginx -s reload,访问http://ip:80,如果出现下面页面则说明配置成功。
配置logrotate自动分割压缩日志
创建/etc/logrotate.d/nginx文件并修改为下面配置内容。
1 2 3 4 5 6 7 8 9 10 11 12 13 14 15 16 #path /etc/logrotate.d/nginx /var/log/nginx/*.log { daily missingok rotate 52 compress delaycompress notifempty create 640 nginx adm sharedscripts postrotate if [ -f /var/run/nginx.pid ]; then kill -USR1 `cat /var/run/nginx.pid` fi endscript }
手动运行logrotate命令来测试配置是否正确:
1 logrotate -f /etc/logrotate.d/nginx
确认一切正常后,您可以通过以下命令来实际执行logrotate并轮转日志文件
1 logrotate /etc/logrotate.conf
参考:openresty.org